0

How To Dye Ombre Gradient Yarn

P1140079

Lately I’ve been seeing beautiful ombre yarn and decided to give it a shot. Personally I aim to find the easiest and most effective way when trying out a new technique. In the end I took bits from other techniques and adapted them till I liked the result.

You’ll need: yarn of choice, acid dyes, vinegar or some acid, gloves, and something to cook the dye in (I use an old crock pot)P1140084

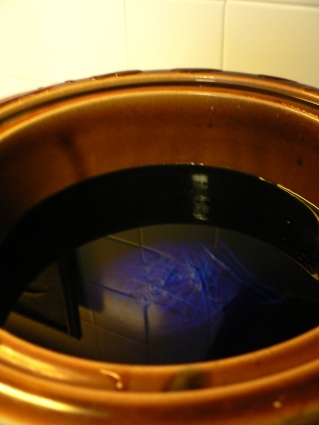
First step: wind the yarn into a loose ball. It should be easily squished ball of yarn.

Second step: add your dye and water into the pot of your choice. Remember it has to be a strictly dye only pot. Make sure you add enough water so that the ball of yarn can be completely covered.

Third step: place the dry loose ball of yarn into the dye water with gloved hands. Continue to squeeze the yarn to absorb dye water until no bubbles emerge from the yarn. Put on the heat and let the yarn cook for a bit.

Forth step: when most of the dye has been absorbed turn off the heat and add your vinegar or acid. If it’s not to hot give the yarn some squeezes to absorb the vinegar. Otherwise let it cool for a bit. IMG_20141103_210515

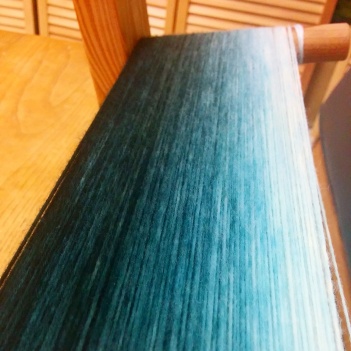
Fifth step: once the yarn has cooled and the dye has been absorbed then you can rise and squeeze the water out of your yarn. Then you can turn it into a skein on a niddy noddy. It can be a bit tricky when it’s wet so I tend to let it dry a few days in the ball form.

Now you have your own ombre gradient yarn!

1

Lazy Girls Gnocchi

Lately I’ve been having major gnocchi cravings, but I always find rolling the gnocchi a pain. I even have a pasta maker and was desperately hoping for a gnocchi. No such luck for me. Then I happened to come across a cleaver trick on Food and Wine, which I decided to give a shot. First time I used to suggested bakers twine with some sweet potato gnocchi dough. Either the baking twine was too thick, the dough was too moist, or I simple couldn’t get the angle down the gnocchi came out “fun shaped.” That didn’t discourage my attempt at being able to make gnocchi without rolling. So the second time I tried out my lazy gnocchi recipe and tried the same technique, but with unflavored dental floss. While it was far more effective the steam caused the dental floss to lose its tension. So far the most effective method has been using fishing line of all things.

 The next key factor for me was finding an easy recipe to use and a resourceful thought popped into my head, “there’s leftover mashed potatoes in the fridge maybe that will make good gnocchi.” With that thought I managed to create easy delicious gnocchi from leftovers.

  Lazy Girls Gnocchi Recipe 
Serves about 2
2 egg yolks
1 cup flour (may need a little more depending on mashed potato moisture)
13oz leftover mashed potatoes (I used Simply Potatoes garlic mash)
  1. Place mashed potatoes in mixing bowl, slightly heat up if stiff.
  2. Then add egg yolks and flour. Gently mix and add extra flour till dough is no longer sticky to the touch. Then place in gallon or pastry bag.
  3. String your fishing line (twine or dental floss) across the handles of your shallow pasta pot and secure. Place water in a few inches below string. Bring water to boil.
  4. Once the water is boiling bring down to medium heat. Cut a hole in the tip of your bag.
  5. Place the bag perpendicular and to the side of the string. Start pushing the dough out and cutting at the desired length on the string. Don’t over crowd the pot. CATION: Be careful of the steam and any hot water that may splatter as the gnocchi drop.
  6. Wait for the gnocchi to rise to the surface then pull out with a slotted spoon. Repeat steps 5 and 6 till all dough is gone.
  7. Lastly top with gnocchi with something yummy.

Topping wise for my gnocchi I like to toss them in a pan to get them a little crispy then add my favorite tomato sauce, spices, and cheese on them.

5

Beehive Honeycomb Knit Boot Cuff Pattern

Beehive Boot Cuff Pattern

  • Bulky yarn about 100 yards and up depending on size

  • 4 Double pointed US size 10 1/2 needles

  • scissors

  • tapestry needles

CO 38 (44, 50, 56, 62…etc depending on desired size) divide evenly and join in round

Round 1-4: *(K1, P1) Repeat

Round 5: K all, add 4 stitches evenly throughout by kfb

Round 6: P all

Round 7-12: *(K4, slip 2) Repeat

Round 13: K all

Round 14: P all

Round 15-20: K1 *(slip 2, K4) Repeat. End round 20 with K3.

Round 21: K all

Round 22: P all

Repeat from Rounds 7-22 till desired length. End on either round 12 or 20.

Round 23: K all

Round 24: P all

Round 25: K all, decrease 4 stitches evenly through by k2tog

Round 26-28: *(K1, P1) Repeat

BO in *(K1, P1) fashion

Weave in ends and enjoy! 🙂

Notes: Following these instructions 38 stitches fits up to 13 inches around.

0

Hedgehog Pattern


Hedgehog Pattern

  • 4 US 5 (3.75 mm) DPN

  • 60 yards of worsted weight yarn MC

  • 20 yards of worsted weight yarn CC

  • scissors

  • stuffing

  • tapestry needle

Ears (Make 2)

CO 8 sts in CC join in round

Rnd 1: KFB (16)

Knit every round till it measures about 1/2 inches then BO weave in top end and attach to hedgehog.

Back of Body:

In MC CO 4 sts

Row 1: KFB, K2 , KFB (6)

Row 2: PFB, P4, PFB (8)

Row 3: KFB, K6, KFB (10)

Row 4: PFB, P8, PFB (12)

Work in St st for about 10 rows 2 inches from cast on, end after a purl row.

Decreasing

Row 1: SSK, K8, K2tog (10)

Row 2: P2tog, P6, P2tog (8)

Row 3: SSK, K4, K2tog (6)

Row 4: P2tog, P2, P2tog (4)

Body:

Continued from back of body

Knit the 4 sts on the needle, on same needle, pick up 10 sts around back of body, continuing around till there are 42 sts, 14 per needle

Rnd 1: * KFB, knit to the last st on needle, KFB; repeat for each needle: 16 sts per needle (48)

Repeat Rnd 1 again 18 sts per needle (54)

Knit every round alternation between pulled curl stitch and knit round till about 1 1/2 inches long. May do 1 pulled curl stitch round and 2 knit rounds for less work, doesn’t create as full look. Determine the belly of your hedgehog and always knit that needle. To make a curled stitch knit into a st and pull it to about 2 inches long, twist around finger then place back onto needle. Knit normal and curled stitch together.

Decreasing Rnds continue alternating between normal knit and curled stitches

Rnd 1: * K7, k2tog repeat 16 sts per needle (48)

Rnds 2-5: K all (4 rounds total)

Rnd 6: * K6, k2tog repeat 14 sts per needle (42)

Rnd 7: * K5, k2tog repeat 12 sts per needle (36)

Rnd 8: K all

Rnd 9: * K4, k2tog 10 sts per needle (30)

Rnd 10: K all (end on curled round)

Rnd 11: Switch to CC and stop curl stitches K All

Rnd 12: *K2tog, knit to last 2 sts on needle, K2tog repeat 8 sts per needle (24)

Rnd 13-17: K all (5 rnds) Begin stuffing as you go

Rnd 18: *K2tog, knit to last 2 sts on needle, K2tog repeat  6 sts per needle (18)

Rnd 19-21: K All (3 rnds)

Rnd 22: *K2tog, knit to last 2 sts on needle, K2tog repeat 4 sts per needle (12)

Rnd 23: K all

Rnd 24: K2tog all 2 sts per needle (6)

Finish stuffing. Cut the yarn, leaving a long tail. Pull the end through the remaining sts, gather up tight to close the hole, and stitch to secure. Weave the end to the inside and trim. Sew on nose and eyes. This cute fellow comes out to be about 5 1/2 inches long, 3 inches tall, and 3 inches wide.

0

Raindrop Pattern


Have some extra yarn that you don’t know what to do with? Try this simple raindrop pattern then! It knits up amazingly quick and needs less than 10 grams of worsted yarn. This pattern can be used to make a cat toy, amigurumi raindrop by adding a cute face, or even part of a baby mobile. It’s all up to you so happy knitting 🙂 They come out to be about 3 1/2 inches tall by 1 1/2 inches.

Raindrop Pattern

  • 4 US 5 (3.75 mm) DPN

  • 10 grams of worsted weight yarn

  • scissors

  • stuffing

  • tapestry needle

CO 9 divide onto 3 needles and join into round

Round 1: KFB all (18)

Round 2: K all

Round 3: (KFB, K1)* Repeat till end (27)

Round 4: K all

Round 5: (KFB, K2)* Repeat till end (36)

Round 6-12: K all (7 rounds)

Round 13: (K2tog, then K till last 2 stitches on needle K2tog)* Repeat on each needle

Round 14-15: K all (start stuffing as you go)

Round 16-24: Repeat rounds 13-15 x3

Round 25: K2tog all

Round 26-27: K all

Round 28: K2tog all

Cut a yarn tail and pull yarn through remaining 3 stitches and weave ends in.

2

Nutella Mug Cake

For awhile now I’ve been trying all sorts of mug cakes and cookies in a mug just to satisfy my occasional sweet tooth. Though none were truly that satisfying. They either had a bland taste or would have the consistence of a sponge, yuck! After a bit of searching I came across a recipe that looked yummy, but needed a bit of adjusting to fit my needs. Some testing and plenty of tasting later I’ve found a wonderful and quick sweet fix, a nutella mug cake. The cake is soft and creates a gooey nutella pudding at the bottom.

Nutella Mug Cake Recipe

Serves 1

Takes under 5 minutes

  • 1 Large mug

  • 1 egg white

  • 2 Tb flour

  • 2 Tb sugar

  • 1 1/2 Tb cocoa

  • 1 1/2 Tb milk

  • 1 1/2 Tb vegetable oil

  • 1/4 ts salt

  • 1/4 ts baking powder

  • 1/4 ts vanilla

  • 1 Tb Nutella

  1. Place the listed ingredients into a large mug.

  2. Mix ingredients together till smooth.

  3. Place mug and contents into microwave and cook for around 1 minute 20 seconds. Contents will be hot and a bit gooey at the bottom.


0

Healthier Super Yummy Pizza


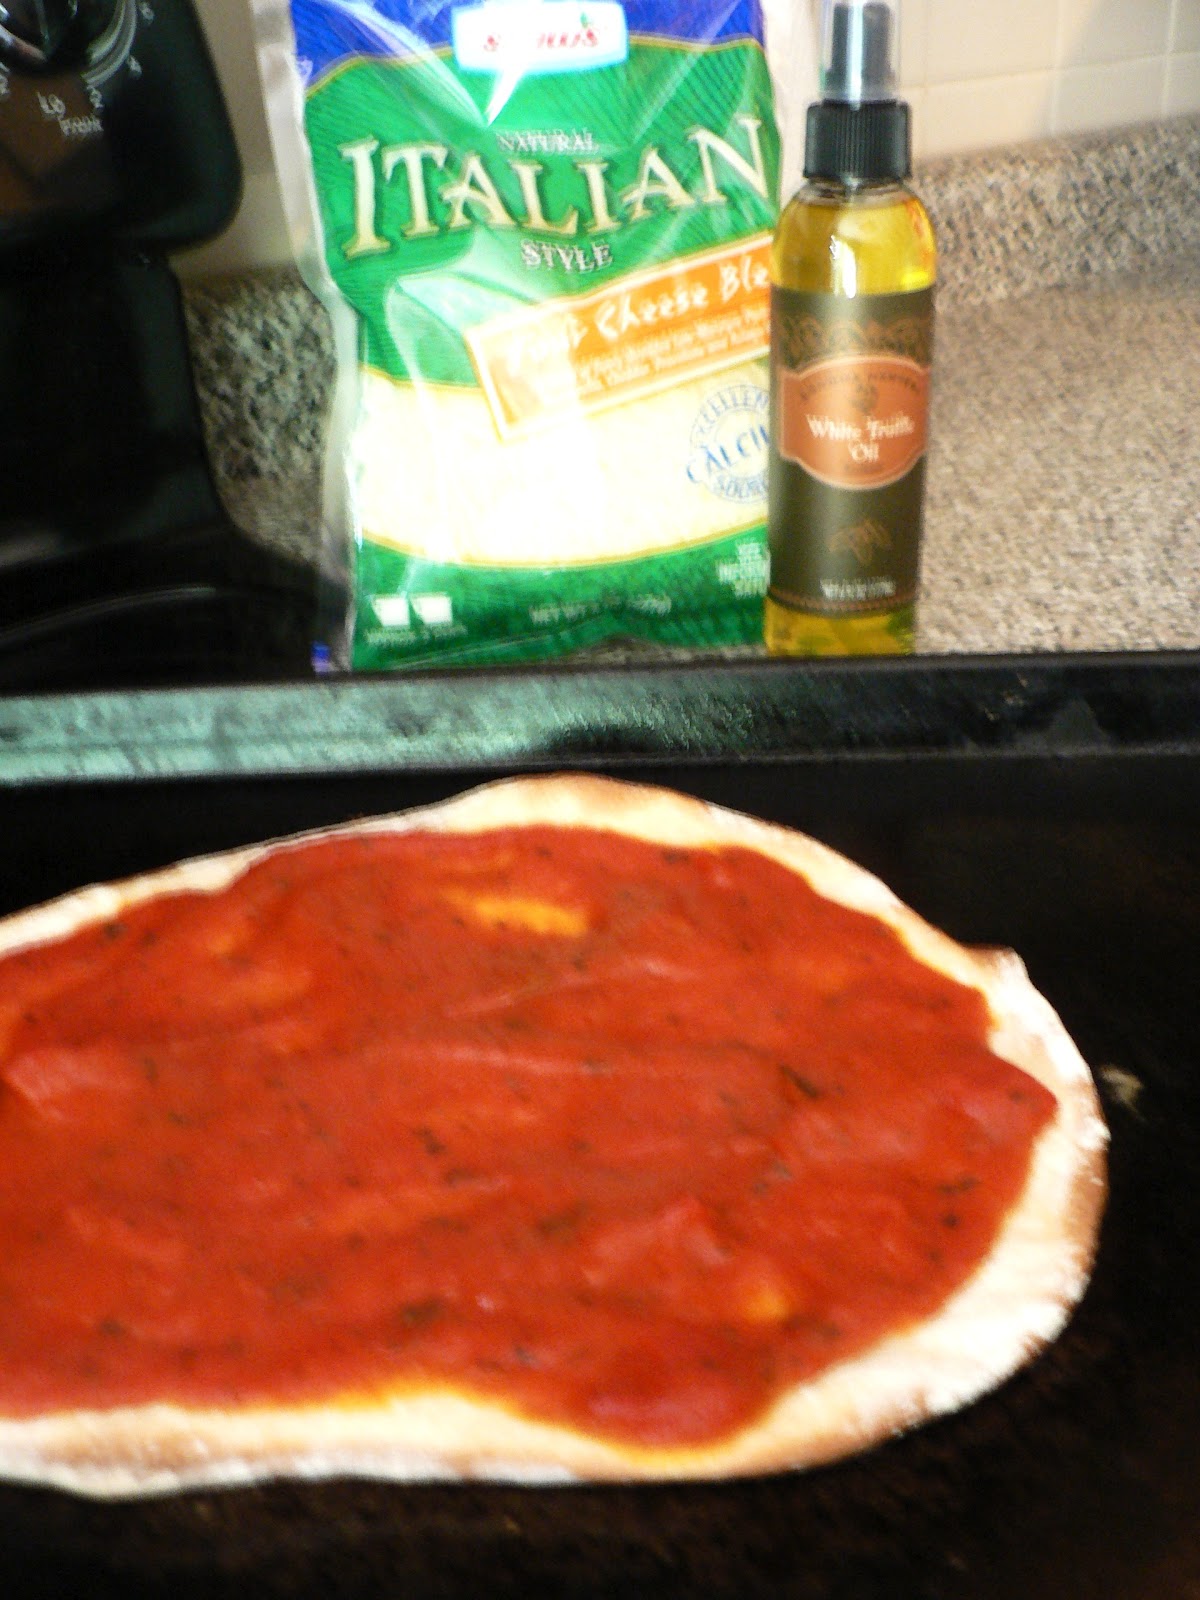
This is a personally recipe for pizza that I use all the time! It’s delicious and healthier for you due to the whole wheat flour. I know whole wheat flour can rub people’s palettes the wrong way, but I swear you won’t even notice that there’s any there. I’ll even admit that I’m a picker eater and I can’t tell that there’s any there. Anything that has a funny texture or after taste I’ll stay a mile away from, but this recipe is so yummy I have to keep myself from eating it multiple times in one day. So please enjoy 🙂


Pizza Dough Ingredients:

  • 1 1/3 cups warm water
  • 1 tsp sugar
  • 2 tsp salt
  • 2 Tbsp olive oil
  • 2 cups bread flour
  • 2 cups whole wheat pastry flour
  • 2 1/4 tsp yeast
I know you must be thinking why whole wheat pastry flour? I choose whole wheat pastry flour since it has been finely ground removing the chance of the pizza dough having a gritty texture. I also like my pizza rolled out super thin and the low gluten content in pastry flour allows me to easily roll out the dough without it shrinking. I also don’t let the dough rise mainly because I like thin pizza, but mainly because when someone wants pizza they’d much rather have it now 🙂
Honestly I usually just throw all of these ingredients into my bread maker and just let that do the work while I get everything set up. A standard mixer will work just as well.
While you’re waiting for the dough to come together set your oven to 475 degrees F, oil up a pan of your choice, flour a surface and rolling pin, and get your toppings.
Once the dough is done roll it out on a floured counter to your desired size and thickness. Place on the oiled pan and slather on your tomato sauce of choice. Don’t put any cheese on yet. It’ll burn and the sauce won’t cook down to deliciousness.
Place the pizza in the oven for about 8 minutes or until the edges start to lightly brown. At that point pull it out and put your toppings of choice on. Place back in the oven for 3-5 minutes or until the cheese starts to slightly brown. Pull the pizza out, cut it up, and enjoy.
For my pizza I decided to put on some basic cheese, fresh basil, and some white truffle oil. YUM! Mine did get a little burnt, but still oh so delicious. So please enjoy! 🙂
0

How To Dye Yarn

Now that I’m on summer break I finally have time to work on the blog. So I decided it would be a fun idea to give a little how to on dyeing yarn.

What you’ll need:

  •     Water
  • Vinegar
  • saran wrap
  • Acid dyes of your choice
  • yarn to dye
  • plastic cups
  • paint brushes
  • Small bowl that isn’t used for food (microwavable)
  • Large bowl to soak yarn in
  • Gloves (unless you want multicolored hands)
  • Either a table you don’t mind getting dyed or an old towel and a large piece of cardboard
  • Mesh bags optional if you want to throw yarn into spin cycle

First start off by soaking the yarn in a water vinegar mix for about 5-10 minutes. Enough time so that the yarn has absorbed as much of the liquid as it can. If the yarn is not given enough time it will have dry spots where the dye will not be absorbed, leaving white spots. Once the yarn has been soaking for awhile remove from the bowl and allow the excess liquid to drain out of the yarn.

As the yarn drains set up your area. For me I first laid down my large piece of cardboard then placed my old towel over it. Then placed a large sheet of saran warp to place the yarn on.

With the yarn placed on top of the saran warp have your acid dye prepared. To prepare the acid dye just place a small amount in the bottom of the plastic cup and add water. Now you can start to dye/paint your yarn, but don’t forget your gloves. You can paint your yarn any color or in any pattern you want.  For this yarn I was doing different shades of one color by adding more water to the dye as I painted. Don’t forget to paint both sides of the yarn.

Once you’ve completed your painting it’s time to wrap your yarn. Take both long sides of the saran wrap and fold it on top of the yarn. Next take the short ends and fold those in.

Next roll the saran wrapped yarn into a roll.

Placed the rolled yarn into the “no food” microwavable bowl and put into the microwave for 1 minute. Once the minute is up let it rest for another minute. Then put the yarn in for 1 more minute. After that take the yarn to the sink and let it rest for a bit. Then carefully, with water running, remove the yarn from the saran wrap. The yarn may be extremely hot so be careful not to get burnt. Once the yarn is out of the saran wrap rise the yarn till the water runs clear.

Lastly find a place to hang the yarn where it can dry. Once the yarn is finished drying you get to become the proud creator of your own hand dyed yarn.

0

Sesame Seed Candy

Sometime around September 2010 my little ocean town acquired a second organic grocery store. Years ago my mother introduced me to the most delicious thing ever (other than sushi and mint chocolate chip ice cream): Sesame seed candy! It was wonderful. A hard crunch that slowly turned into a stick to your teeth chew, and the underlying toasted tones that almost resembled peanuts. Just yum! There they were again at the front counter. We bought several and I realized I needed to make my own so recently I’ve been trying to recreate this delicious treat and I believe that I may have got it.

 First off, the ingredients:

  • 6 tbs honey

  • 6 tbs brown sugar

  • 1 cup sesame seeds (or toasted if you want to cut out some work)

  • a pinch of salt

Equipment:

  • a small saucepan
  • a large saute pan for toasting the seeds
  • 2 stirring spoons
  • a bowl scrapper
  • large bowl
  • oven pan to let candy cool on
  • rolling pin
  • parchment paper
  • candy thermometer
  • cookie sheet preferably with no edges
  • a large knife

Steps:

  1. Combine salt, honey, and brown sugar in the saucepan.

  2. Put saucepan on low heat with candy thermometer. You’ll have to wait till it says 302 degrees F to be done. (Make sure you picked a sauce pan that will give the honey/brown sugar mixture room to bubble, cause it does!)

  3. Place seeds in saute pan on medium low heat. Continue to rotate and stir the seeds till they begin to slightly brown (tan) and begin to give off a lightly toasted scent. Remove from heat and place in large bowl.

  4. Place a piece of parchment paper inside your cookie sheet.

  5. Once the candy thermometer reaches 302 degrees F, remove the honey/brown sugar mixture from the burner and turn off heat. Immediately mix into the bowl that contains the seeds. Mix quickly then pour onto lined pan. (anything used so far place in sink and let soak, this stuff is sticky!)

  6. Place another piece of parchment paper over the candy mixture.

  7. Take the rolling pin and roll out candy to the desired thickness.

  8. After rolling let cool slightly so that it’s not too hot to the touch, but it still gives. At this point cut the candy into the desired size and shape.

  9. Let cool to room temperature then place in refrigerator.

  10. After an hour or so it is now time to break apart and enjoy!

Thank you and I hope everything goes well!